well-nigh a week, I receive electronic mail asking how I create my wallpaper photos; this is an attempt to answer these questions. except I sat right down to outline this article, I didn't realize how many steps I basically go through!
For context, I've been a photography fanatic for a long time. though I've taken simplest two images courses, I've examine lots of books, and i've subscribed to many photography magazines, including Digital photograph professional, outside Photographer, established photography, and Petersen's Photographic (which is no longer posted). I'm additionally a member of the country wide association of Photoshop specialists (NAPP), and that i acquire their mind-blowing Photoshop user magazine and Layers journal. I've owned numerous cameras, together with a couple of older Minolta SLRs, some Nikons, and most recently, a Canon insurrection XT. I made the transition to digital images sometime in 2000, and that i haven't appeared back.
as far as i will be able to inform, my first digital "wallpaper" image turned into created on March 21, 2002 while on a Royal Caribbean cruise to Key West, Florida. i used to be jogging previous the Ernest Hemingway domestic & Museum when i noticed a backlit banana leaf. I leaned over and captured the photo using my Nikon COOLPIX 990, a 3.34 megapixel buyer digicam that had a remarkably respectable macro mode. because it seems, that photo changed into an early favorite, and it ended up delivery as one of the most windows Vista wallpaper images. It's mind-boggling to consider that—as of June 1, 2008—greater than 100 million americans have a duplicate of my graphic on their computer.
The information and thoughts in this article have worked smartly for me, and that i hope you'll get some perception and suggestion in growing your personal wallpaper photos.
Attributes of good Wallpaperbefore you push the shutter button, it's price pondering about the attributes of a superb wallpaper photograph. there are lots of sites on the cyber web that easily crop current photographs to create new wallpaper. but if you've ever downloaded and used these photographs, you may additionally have seen that they simply don't seem to work very neatly. with a bit of luck, i will be able to clarify why that could be the case.
Iconsvery nearly every laptop contains icons for quite a lot of documents and courses. although I haven't performed any scientific analysis on the area, pcs seem to be have a majority of their icons on the left facet of the monitor. when they're now not on the left aspect, they're nearer the perimeters. perhaps here is as a result of we like our functions to open in the middle of the monitor. Regardless, I are trying to avoid unnecessary visual aspect on the left aspect. I've considered way too many wallpaper photos which are eye-catching photos, however when I truly use them, my icons wander off, or they're problematic to discover. photographs with a lot of visible detail tend to crush anything that's positioned on right of them.
a method to cut back the visual element in a picture is to shoot with a shallow depth of field. For these unfamiliar with images, depth of box refers back to the component of the graphic that it is in sharp focus. With a shallow depth of box, loads of the graphic is out of focal point, and these out-of-center of attention areas work tremendous as a historical past for icons. The icons will "pop" and be very effortless to discover and skim. while there's nothing inherently incorrect with an image that's in general out of focal point, many individuals discover it counterintuitive to take a photograph like this. We're taught to shoot photographs which are as in-center of attention as possible. but, if the graphic is to be used as wallpaper, here's a method to make it more usable.
For commonly in-focal point images, massive blocks of identical texture and color can solve the identical issue. here is why pictures with a big, blue sky or a deep, sandy seaside work so well as wallpaper.
As outlined previous, if you're considering icon placement, put the in-center of attention parts of the image within the center, away from the perimeters.
CompositionI take many types of photographs, however I notably savor shut-up, or macro photography. i can actually seize a digicam, walk into my lower back yard, and find new photographic opportunities in a relatively restricted space. when you've begun taking macro photos, you'll find yourself searching on the world through different eyes. i admire to take shut-up photos which are greater summary. My purpose isn't to readily document the field (like you might expect in a textual content publication). It's to take a more in-depth seem and intensify points like colour, distinction, lighting, texture, traces, and relationships. These are all aspects of composition.
photographs should also have a obviously defined field. This tips isn't selected to wallpaper images, and it's always critical. photographs with too many topics create confusion. Subconsciously, the viewer's visual device won't recognize what to focal point on. Ideally, decide upon one element (like a leaf floating in a pond) to make use of as your subject, then body or crop the photo to accentuate the area. Don't be afraid to are attempting cropping extra tightly than you're comfortable. You could be pleasantly shocked with the outcomes.
I used to must believe consciously about these elements after I appeared during the viewfinder on the camera. It gave the impression of loads of work! but, as with most issues, the more experience I've won, the more I appear to intuitively "think" the place I should still factor the digicam, vicinity the area, and crop the picture. for my part, powerful composition is the way you turn a typical photo into an artistic image.
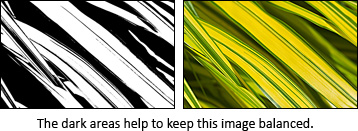
stabilityAny picture that you just create should still be balanced. it really is, if one side of the image is "heavy" (this may well be according to colorations or objects within the picture), then there should still be whatever thing on the opposite side to balance it out. as an instance, in lots of of my nature close-ups, there's frequently a dark, out-of-center of attention enviornment behind the leading discipline. If I exhibit any of that darkish enviornment in a single corner of the photo, I seek a means to include a darker enviornment in the opposite corner. stability gained't work with each image, nevertheless it should still at all times be regarded. Squinting your eyes a little bit to blur the graphic can help to establish areas like this.
 test Your Wallpaper
 essentially the most vital aspect I do is to "test force" each and every candidate photograph I create. i use the wallpaper on my home desktop for a few days, and if it doesn't seem to fight with my icons, it nonetheless holds my activity, and the first-class is excessive ample, I'll publish it. You'd be shocked how many reputedly good wallpaper photographs I reject. I'm convinced that most wallpaper websites on no account try this essential examine.
Technical issuesNow that you're standard with the attributes of a superb wallpaper image, we'll stream on to some of the more technical issues. As you've seemingly heard earlier than: it isn't the equipment that matters…it's the way you use it. Following the instructions above will enhance your wallpaper photographs a great deal more than the technical counsel and tricks beneath. but, proper realizing and use of your technical machine can certainly make a good image even greater.
monitor Calibrationyou could't edit a picture with self belief if you don't have confidence that the colorings to your reveal are suitable. To be certain color accuracy, I work with a colour calibrated device. This capacity that a colour like "purple" has a typical representation throughout all of my gadgets (scanner, printer, and display screen). So, the picture I scan appears like the photo I edit, which appears like the image I print.
For wallpaper photographs, it's most crucial to calibrate your display screen. I in my opinion use a calibration tool referred to as Spyder by means of Datacolor. A calibrated system ensures that any modifications I make to an image don't shock me, and it additionally offers a constant context for my work. Granted, most clients of your wallpaper photos won't have a colour calibrated equipment, however in my adventure, it nevertheless gives a large benefit.
Cameras and LensesI used to shoot my close-up wallpaper photographs with a Nikon COOLPIX 990, an older 3.34 megapixel customer digicam. Its macro mode worked rather well, and it served me for decades. Like many purchaser cameras, it had a swiveling monitor that allowed me to take low-to-the-floor pictures that might be extraordinarily tricky with a SLR. All of my older photos had been interested by this digicam.
As with the rest, I all started to note limitations of the equipment as I won experience and honed my important eye. In selected, the small sensor dimension within the Nikon (like most non-SLR cameras) became more discipline to noise. This supposed that loads of my photographs had extra perceptible "grain" in them than I appreciated. Plus, a smaller sensor isn't as delicate to light, and if you're taking pictures very shut-up pictures, you want a delicate ("fast") digital camera and lens mixture.
a number of years in the past, I upgraded to an 8 megapixel Canon Digital insurrection XT digital SLR with a Canon EF-S 60mm macro lens. i like this lens! It's very light-weight, which makes it convenient to shoot handheld. Plus, it's essentially distortion free and has amazing colour. For shooting out of focal point wallpaper, its f/2.8 aperture permits lots of mild and makes it possible for me to throw a whole lot of the picture out of focal point. My more moderen pictures were interested in this digicam and lens mixture.
herbal gentleI in my opinion pick the appear of natural easy, so I don't use a flash for any of my macro photographs. here's a creative selection of mine. It does introduce some challenges, as a result of things like flowers and leaves like to stream within the breeze, and with much less easy, I often have to use longer exposures. This ability that the shutter is open for an extended length of time, and the subject blurs. No enjoyable.
taking pictures in uncookedI used to shoot most effective JPEG photographs. until I discovered what a uncooked photograph definitely is. as the identify implies, uncooked outlets the genuine uncooked information that the camera captured if you happen to pressed the shutter button…without any interpretation. think of it just like the digital equivalent of a film bad. This additional information potential that you've much more flexibility when processing the image after-the-fact. With a JPEG image, the camera makes many decisions about processing on-the-spot, and a lot of of these decisions can't be reversed. also, JPEG photos comprise 8 bits of information per color, while raw images customarily contain 12, 14, and even 16 bits of counsel. For these of you who don't have any concept what this skill, let me try to explain.
When a digital digital camera opens its shutter, mild from the scene flows in the course of the lens of the digital camera and strikes a sensor (comparable to how easy strikes your eye). Like your eye, the sensor is made up of very small purple, eco-friendly, and blue detectors. each and every of these detectors facts the depth of the light that strikes it and shops it as a number. a nil ability that no easy hit that sensor, and better values mean that more gentle changed into detected. the total count of computing device "bits" per number/colour determines how many different intensities may also be saved. The greater intensities that can also be stored, the more shades that can also be represented.
in case you don't take note what bits are, thinking about generic numbers might make it more straightforward. If I advised you that i used to be going to shine a lightweight on a bit of paper, and i wanted you to list how vivid that easy became, and i advised you that you just might only use a single digit, you'd be able to listing 10 distinct intensities (0-9). If I requested you to do it once more, however this time you could use two digits, you'd be capable of checklist a hundred distinctive intensities (0-99). every additional digit I provide you with means that you can enhance the measurements that you may seize with the aid of a factor of 10. neatly, with binary numbers that most effective have two digits (0 and 1), it's the actual same considering, apart from that each extra digit lets you checklist two times greater in its place of 10. So, an eight-bit (digit) number can signify 256 different values (0-255), whereas a 12-bit quantity can signify four,096 diverse va lues…16 instances as a whole lot! And a 14-bit quantity can signify 16,384 values! As you can see, the extra bits you've got, the extra facts that you would be able to store about your graphic.
through capturing raw, I'm in a position to capture a much broader dynamic latitude (change between the darkest and lightest components of the photo). This means that i will be able to "get well" highlight and shadow details that may additionally had been completely thrown away in an analogous JPEG photo. There are various opinions about raw on the information superhighway, so you'll want to test for your self. For my funds, though, if you're attempting to create the highest quality image which you could, uncooked is the way to go.
after I procedure my raw photos in Photoshop, i use the 16-bit ProPhoto RBG colour house. This color space is higher than what my Canon insurrection XT supports, which ability that no counsel is lost when I open the file. by using working in sixteen-bit mode, I can make more adjustments with out incredibly degrading the photo. simplest when I'm able for output do I convert the photograph to eight-bit with a standard sRGB colour area.
graphic Dimensionsdo you want a camera with more megapixels? The commonplace argument is that megapixels don't remember a great deal after a undeniable point, unless you intend to print your photograph actually giant. but, what if you make a decision to crop the photograph? As I mentioned earlier, decent wallpaper requires decent composition, and composition can almost always be stronger with the aid of cropping. Cropping can remove a lot of pixels, leaving the closing photograph with reduce dimensions. if you then want to print that lower dimension graphic on enormous paper, which you could run into boundaries.
My information, chiefly for photographs that can be cropped (most of mine are) is to shoot a picture with as many pixels as feasible in order that you have got extra flexibility later. suppose of extra megapixels as an coverage in opposition t poorly composed photos. these days, the smallest I'll crop my wallpaper is 2,560 x 1,600 so i will be able to support larger displays just like the Dell 30" 3007WFP. There were repeatedly when—after cropping—the graphic is barely large adequate to fit that dimension.
Use a Tripodwhereas i like handheld macro pictures because of their relative ease, on every occasion I want extra of my picture in focal point, i use a tripod. The tripod makes it possible for me to make use of a slower shutter velocity through holding the camera solid while the lens is open. At close-up magnifications, even the slightest movement of the digital camera or field may cause undesirable blur. A tripod is the superior approach to make sure that your photograph is in sharp center of attention.
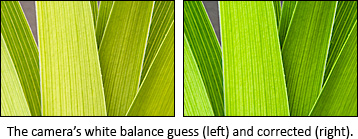
White steadinessWhen a digital camera takes a photo, it uses refined algorithms to determine the image and wager the colour of the gentle hitting your discipline. whereas cameras have turn into rather first rate at this, for close-up photographs the place one colour is dominant (like a group of green leaves), the guessing algorithm will also be at a loss for words, and a color solid may well be delivered. because the human visual equipment can quickly adapt to distinctive lighting fixtures instances, it will also be hard to notice when the colour isn't relevant. White steadiness is the procedure of getting rid of these undesirable color casts. There are two tips on how to make certain correct color. One is to make use of the custom white balance feature of your camera to picture whatever neutral (that's, whatever containing equal parts purple, green, and blue). Expodisc makes a product that works with this feature.
The 2nd components involves including a impartial reference in one of your photographs. this way, you have got a reference for you to aspect Photoshop to in case you open the photograph. by using telling Photoshop where the neutral reference is, it might probably calculate how a ways "off" the shades are and alter them instantly. There are expensive multicolor aims available for purchase, but I've found the WhiBal card to work extraordinarily smartly. It's very portable, rather not pricey, floats, and is neutral all of the means through (so scratches don't lessen its effectiveness). I particularly advocate it for the rest the place you want correct shades. i use it very nearly all the time, particularly for my close-up pictures.
 Photoshop
 All of my photographs are comprehensive in Photoshop CS3. as a result of I shoot raw, I beginning by way of opening my Canon .CR2 info. I first use the eyedropper device to set the white steadiness by clicking on the photo with the WhiBal card. I then practice those settings to any other picture that changed into taken beneath the equal lights circumstances. This ensures that I beginning with correct color.
next, I are trying clicking the "auto" mode in digicam uncooked, because I've found that it offers an outstanding starting point for edits. From there, I commonly follow the settings from properly to backside. I be certain that I haven't clipped any highlights, and that i "get better" them, if necessary. I make sure that I on no account trim blacks and add fill light if areas of the image are murky. I almost always bump up the distinction a bit of, as a result of i love the seem to be of photographs with more contrast. I often set readability someplace round 15, and that i bump up the vibrance to +5 or might be +10 in an intense case. With the addition of the vibrance setting to camera raw, I not contact saturation.
even though there are settings in the different tabs, I don't use them very frequently. If I do, it's to a bit of boost sharpness or selectively saturate/desaturate a specific color. in case you actually wish to be aware the way to use digicam raw in Photoshop, I highly advocate actual World camera uncooked with Adobe Photoshop CS3 by way of Bruce Fraser and Jeff Schewe. It's an attractive publication.
visible Distractionsonce I've opened the picture, i take advantage of PictureCode's wonderful Noise Ninja plug-in to eradicate any noise. If I shot the photo the usage of ISO 100 or 200, I first take a glance at blocks of dark colour to see if here's critical…often instances it's no longer. whether it is, I'll let Noise Ninja clear issues up for me. It's "auto" mode works particularly well. For even enhanced effects, even though, i recommend following the standard steps to create your own digicam profile. Noise Ninja is a plug-in that works in Photoshop's sixteen-bit mode, so full graphic high-quality is retained.
The next step is to remove any visual distractions. Examples could be: small pock marks on leaves, ugly blemishes, perhaps a bright highlight, or an unpleasant trojan horse. If there's anything else that claims "hiya, over right here…examine me" that isn't a vital component of your field, I'd believe putting off it. remember that a wallpaper image isn't intended to distract, and this step will separate the decent photos from the fantastic pictures. I never need to reduce the "truth" of the photograph, but then, I'm developing wallpaper, now not documenting nature.
picture alterationsIf any colour changes are imperative after the usage of the WhiBal card, I'll make them now. I locate that I rarely need to make any changes, though. Then, I'll pop up the Curves menu (Ctrl+M) and check out the Linear distinction preset…I continually just like the influence. I don't generally make many other alterations at this factor, mainly if i was careful concerning the settings I adjusted in digital camera raw.
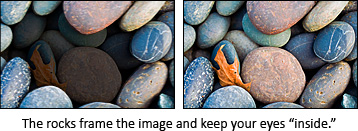
before proceeding, I shop a grasp replica as a PSD file. Then, i use the crop device to create a sixteen:10 aspect ratio version of the photo. I birth with 16:10, as a result of further and further displays are formed like this. There's a lot of experimentation during this step, and i crop off anything else that doesn't directly make contributions to the picture. every so often, I crop so that the image feels comfy or "enclosed." whereas this may additionally sound touchy-feely, i exploit it to create a visible border across the edge of the wallpaper. note the rock picture where the rocks seem to encompass the photo and hold your eyes "interior" of the body.
After I've created the sixteen:10 edition and saved it with a special identify, I then create a 4:three edition the use of the same components. Then, i exploit the 16:10 fashioned to resize to a 2,560 x 1,600 picture and a 1,920 x 1,200 graphic, each ordinary computer screen dimensions. For 4:3, I create 1,920 x 1,440 and 1,600 x 1,200 photos.
closing OutputI only sharpen photographs once they're at their last output decision. So, after resizing to 2,560 x 1,600, i exploit the wise Sharpen characteristic on the whole photograph. I discover that my typical volume values are between 50% and a hundred% with a Radius of 0.eight pixels. whatever thing settings i use for this first graphic are applied to all of the different sizes I create. whereas this can also now not be most reliable, I discover that it works very neatly, and it continues my workflow less complicated.
After sharpening, I first save the resized photo as a PSD file for archival applications. Then, I convert it to an 8-bit photograph (photo, Mode, 8 Bits/Channel) and covert the colour profile to sRGB (Edit, Convert to Profile, vacation spot: sRGB IEC61966-2.1). Don't neglect this last step, or you may additionally find that your graphic hues seem to be atypical in diverse classes. After converting the color profile, retailer the photograph as a JPEG file. I find that a quality atmosphere of 9 works neatly with most of my photos; it's an outstanding steadiness of file measurement and first-class.
at last, I add three pieces of metadata to each photo: writer, feedback, and Copyright. This ensures that a person can always discover their way returned to me for more wallpaper photographs.
Conclusionneatly, i hope that this text turned into in some way informative or inspirational. Like I noted originally, I'm surprised that I move through this many steps for each wallpaper photograph that I create. I've been modifying pictures for so a long time that I not think about every step in my view. I've in no way kept track of my commonplace processing time per image, but if I needed to speculate, I'd say that it's likely round half-hour. counting on your familiarity with the tools, I suppose that you can expect to take a bit longer except you get the cling of it. Please depart a comment in case you'd like me to difficult on any of those assistance.
extra importantly, grab your digicam, get backyard, take some pictures, and have some fun!
Tidak ada komentar:
Posting Komentar